 Address
- Name: Greg Brick
- gdbrick123@yahoo.com
- (716) 725-2828
 Address
- Name: Sunil Adhikari
- info@nepalliontrekking.com
- +61414941445
Address
Address
Lightweight backpack and the idea is very simple. Whether this is your first trip or you’re a seasoned globetrotter, your trekking experience in Nepal is the most elegant feeling of all time. Learning new things, blending with cultures, scenic views of the Himalayas the and heart-melting natural beauty have always been a part of Nepalese popularity.
The list of destinations to trek and zeal to enjoy the most ultimately creates a sense of being prepared. With the things you have and things you wish for trekking is an essential part of the whole trek enjoyment. Moreover, before you regret it, it’s always helpful to have a rundown of what items you may want to pack. Further, A comprehensive international Lightweight backpack travel checklist can be of assist.
Most importantly, bookmark this lightweight backpack list and at least have a look and make the most Lightweight backpack and prepare your essential gear checklist because you’ll want to refer to it as your trip gets closer. Likewise, go through the Essential Gear Checklist and be sure to get suggestions on Lightweight Backpack suggestion. Also, it will make sure you’ve thought of everything else you might want to pack.

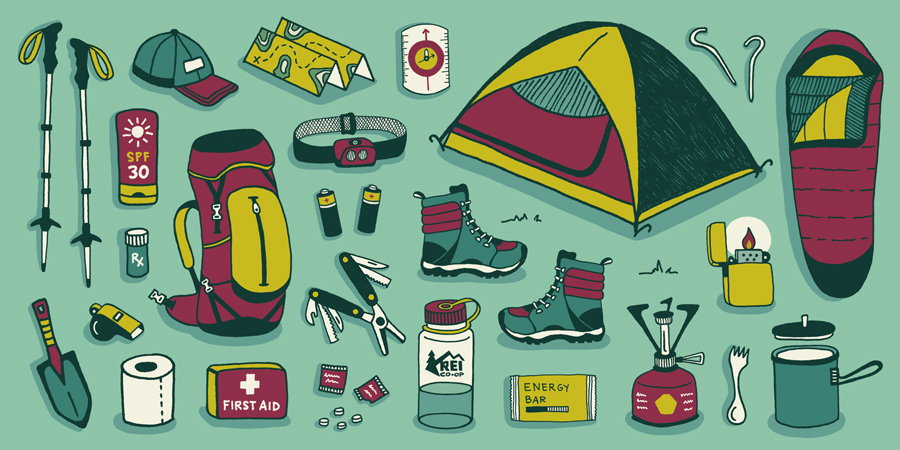
A well-fitted and comfortable Lightweight backpack is the most for any trekking. When buying a backpack, ensure you try it on with a load. Grab a sleeping bag from the store shelves and stuff it in also make sure it’s a lightweight backpack.
Adjust the straps and move around. Does it stay put? Any pinch points? A quality hiking day-pack should have a hip-strap as well. This should sit just atop your hip-bones and will support the bulk of your load.
A day-pack should be light and small, yet roomy enough to carry all your essentials without feeling overstuffed. Look for something in the 20-liter range. The ability to hold a hydration bladder is a feature you’ll come to love as well.

The further from help you roam, the more serious the consequences to something as simple as a sprained ankle. For example, trekking and hiking shoes are fine for gentle strolls in woodsy parks. But, if there’s going to be an elevation change, you need footwear with ankle support.
Always try before you buy. Different brands fit differently—as much as a full size at times—and your foot has specific needs. For instance, modern boots don’t require a long break-in period. If it’s terribly uncomfortable at the store, it won’t get better on the trail.
(1) Waterproofing—it won’t keep your feet dry if you step in a knee-deep puddle. But, it’ll stop trail-muck from seeping in and likely dry faster too.
(2) Breathability—if you’re into speed-hiking, or live in a hot climate, look for a boot with a lot of venting. Consider your intended terrain. Are you going off-trail? You’ll need a stiff-soled, high-cut boot. Easy on-trail hikes only? Soft and comfortable is key; a lower-cut will suffice.

As important as boots! Never hike in cotton socks; they’ll rip blisters in your heels faster than you can say ouch! Further, wool, wool-blend, or synthetic fibers are your friends during athletic pursuits. As a result, not only will they wick sweat, but they’ll save your tootsies from the day-ending abrasions cotton socks are sure to inflict. For instance, splurge on well-fitted, quality socks and you’ll be a happy hiker.

Shirts made from merino wool and wool-blends are ideal for hikers. Also, in hotter weather, full-synthetics (nylon, polyester, polypropylene) may perform even better.
Meanwhile, look for shorts/pants and shirts made from lightweight, breathable, quick-dry, and wicking material. You want protection from sticks, rocks, brambles, and the sun as well as comfort; nylon or cotton or wool/synthetic blends are ideal.
On the other hand, shorts made of similar fabrics are great in hot weather—but consider bugs, bushwhacking and sunburn before you venture out with exposed legs. And don’t forget about your underwear! Look for similar athletic fabrics for your base layers too; the wrong undies can result in terrible chafing.
What are the worst conditions you’re likely to encounter? Pack an extra layer that can handle this contingency. In short, always bring a waterproof jacket, no matter the season. Weather changes quickly in the mountains or on the coast particularly; a rainstorm can come out of nowhere.
A lightweight toque and gloves are considerations in spring, fall, and winter. Similarly, it will work even in summer if you’re headed to the high alpine.

Even in northern latitudes, being sun-safe is vital. Firstly, at a minimum, you require sunglasses, SPF 30 or higher sunscreen (sweat-proof), and a brimmed hat. Secondly, trucker-style caps are great for summer hiking, as they offer the solar protection your need. Likewise, the mesh-back allows heat to escape and they’re easy to cram into a pack.

Don’t just rely on eating before and after. Hiking can easily burn 500 calories per hour. Further, you want to enjoy yourself—not get to the summit “hungry” and eager to leave. For instance, energy bars are great, as are high-protein snacks like nuts and beef jerky.
Similarly, dried fruit can offer a rush of energy when you’re feeling tired. Look for wholesome foods that pack a lot of calories and nutrients into as little weight as possible. And take a treat too, like chocolate chip cookies or a candy bar. Hey—you’re there to enjoy yourself!
Above all, hydration is one of the most important considerations. A typical day-hike (six to eight hours) should see you consume at least two to three liters of water total, more if it’s hot out, taken in small sips every 15 minutes. This is after a half-liter before you leave and considering a half-liter immediately when you get home.
Consequently, minor dehydration may cause symptoms like a headache, nausea, and lack of energy. More severe symptoms can be life-threatening. So, a hydration pack is the best way to keep your H20 flowing.

You should always hike with the following: a trail map, a compass (and the knowledge of how to use it), and your phone—or a satellite communication device if you’re going out of range. A modern smartphone likely has the first two items built-in—and that’s super handy—but batteries die, devices get dropped and cell service disappears. Always have old-school backups.
Your day-hike is likely going to go perfectly as planned. But that doesn’t mean you should assume it’s going to go perfectly as planned. Always prepare for emergencies. Many of these items can stay in your lightweight backpack or day-pack, so they’re ready when you are.
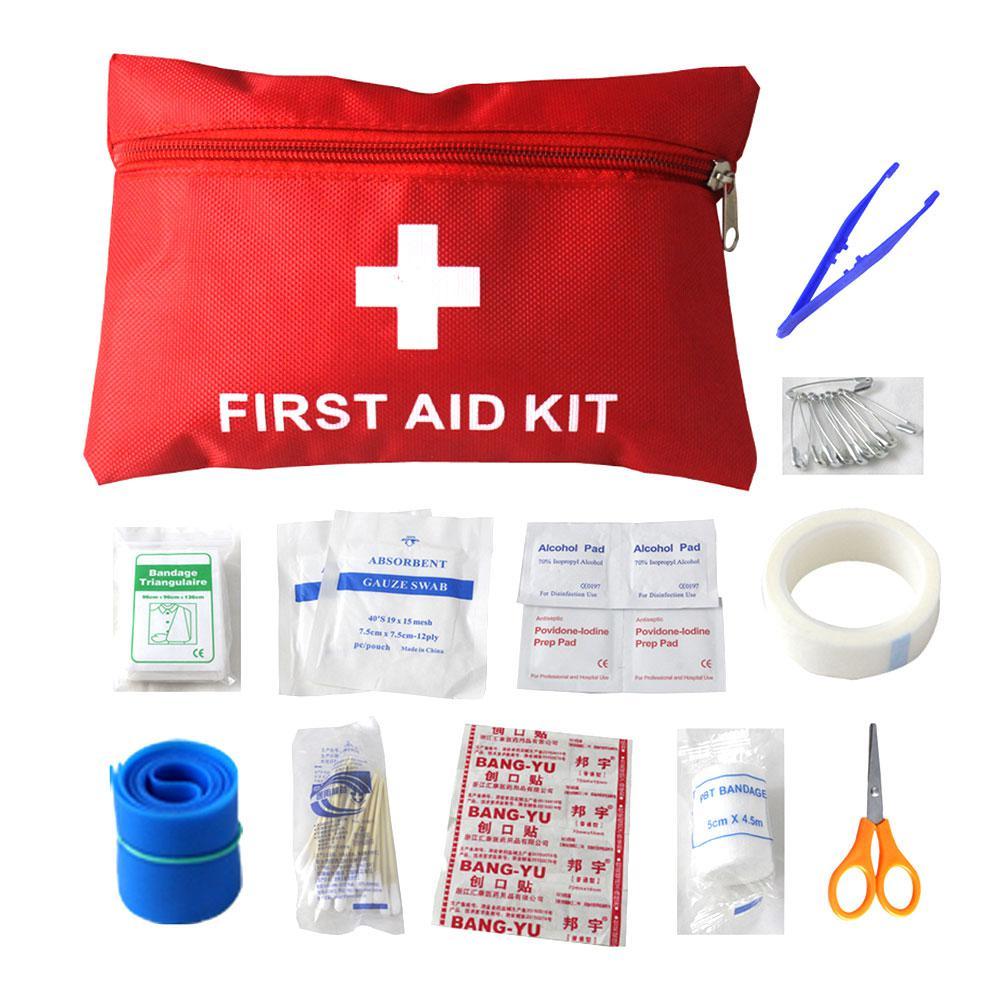
Your first-aid kit should include at a minimum: treatment for blisters, adhesive bandages, gauze, tape, disinfectant, painkillers, relevant prescription drugs (if applicable), and water purification tablets. Bonus points for adding a whistle. This can all be stuffed into a very compact case or even a zip-lock bag. You won’t even notice it’s there.

Consider a fire-steel, for its durability, longevity, and compactness. And make your own tinder/fire-starter by soaking a few cotton balls in Vaseline then stuffing them in a zip-lock. If needed, fluff the ball up, put a spark to it, and be amazed by the burn!

A classic Swiss Army knife or multi-tool is invaluable for repairs, first aid, or other emergencies. It should have at a minimum: blades, scissors, and a screwdriver. If the hike is seriously out-of-the-way, you could up the ante with a small hatchet.
Bonus points if you brought extra batteries.
A fleece stuffed in your pack could make your day more comfortable; a tiny, lightweight space blanket could save your life.
Collapsible trekking poles are often useful—they can really lessen the strain on your knees during lengthy descents. Binoculars are great for birdwatchers. Most people have an adequate camera on their phones, but serious photogs might want to carry a DSLR camera with a zoom lens. Modern mirrorless cameras lessen the load and match DSLRs in quality.
Also, if you take an expensive camera, consider a five-liter dry bag to hide it in if a sudden rainstorm hits. If dangerous wildlife is a concern, bear spray or an air horn are great deterrents. A field guide for plant identification is sometimes useful.

Always leave an itinerary with someone back home! And double-down on safety precautions. Customize this lightweight backpack list to your specific needs and your local environment as well. Perhaps you also need a snakebite kit, an extra pair of eyeglasses or contact lenses, a knee brace, etc?
There are a lot of things that keep you in dilemma regarding what to pack and what not to. But make sure to make the most lightweight backpack as you can including all the necessary trekking/hiking accessories. Here we recommend trekkers to follow the simple tip to lightweight backpack.

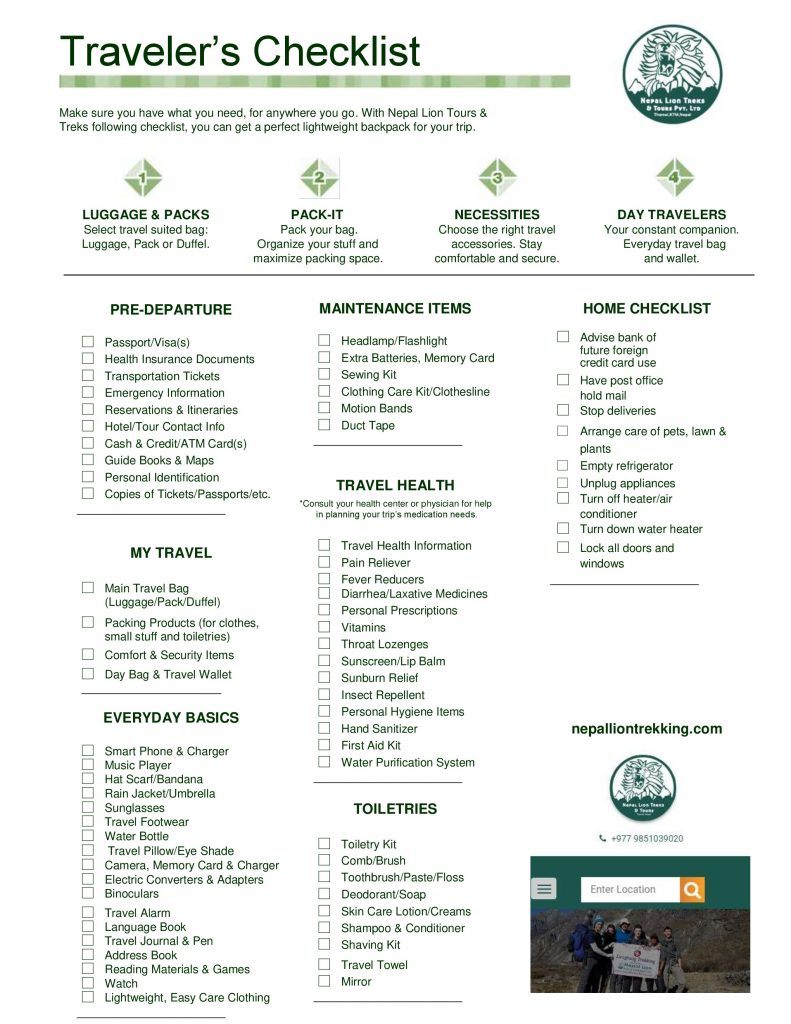
Wherever you’re planning to go, pick luggage that is versatile, lightweight, and big enough to hold all your essentials. The most important decision you’ll make is (as far as luggage is concerned) is buying a bag that has an awesome warranty. Traveling with a piece of luggage with a broken wheel, handle or zipper is the absolute worst! Brands that back their gear with stand-up warranties build that promised durability into their gear. It’s also important to find a travel bag that’s as versatile as you need it to be, while also fitting all your stuff and being easy to carry. Rolling Luggage, 4-Wheels, Duffel Bag, Wheeled Backpack, Travel Backpack, and Carry-On luggage can be great options

If you have lots of different types of activities you plan to do, that means you have a fair amount of gear you need to pack into your suitcase. Keeping everything organized can be a challenge. One of the best things you can do when you’re packing for any trip, especially one that requires you to pack lots of layers, is to make sure you use packing organizers.
Keeping your suitcase organized with packing organizers means not only will you know exactly where everything is, but your clothing can be arranged and compressed so you can fit more in your bag. Why spend your time packing and unpacking when you can quickly unpack by sliding your organizers directly into hotel drawers, and pack up quickly, getting seamlessly from one place to the next without having to rearrange your entire bag every time?
Keep your clothing organized in compartments based on outfit type or activity type by using packing cubes. These zippered organizers make it easy to keep your bag neat and provide quick access to all the different things you’ll need during your trip. You can use compression sacs or cubes to reduce the volume of your clothes by up to 80%. This is especially convenient for bulky items such as sweaters and jackets. And folders are great for keeping dress clothing nice, neat, and folded.
Start with this clothing packing list:
-Lightweight clothing that can be layered
-Long-sleeved shirts
-Sweaters or fleece jacket
-T-shirts and tank tops (be respectful of the culture you are visiting)
-Pants and/or shorts
-Belt – Check out this one for an ingenuitive money protection option
-Socks – wool socks are best for hiking
-Comfortable walking shoes
-Rain jacket, windbreaker, or umbrella
-Pajamas/sleepwear
-Underwear
-Sunglasses and glasses case
-Dresses and/or skirts
-Jewelry – organize in a mini cube or circlet
-Hat or sun visor
-Scarf or bandana
-Swimsuit or swim trunks – consider a wet/dry organizer
-Cell phone and charger
-Travel speakers
-Travel pillow, eye mask, and earplugs
-Electric converters and adapters
-Travel apps that will help with language, directions, and money conversion
You’ll want to pack smart (not lots of) clothing options if your trip will take you to a variety of places, or transversely if you will be navigating off the beaten path. Having options doesn’t mean you’ll need to over-pack. (And in fact, you shouldn’t.) Just pack smart. Include clothing that can be worn on your daily adventures and then dressed up slightly with a different pair of shoes and a scarf. Maybe a dress that becomes a skirt or comfortable travel pants that can be dressed up for a day at the market. Also, consider clothing with SPF or mosquito repellency if you’ll be in environments where that would be beneficial.

If you’re carrying on, keep your toiletry bag light and TSA-compliant. The TSA’s 3-1-1 rule makes it easy to remember: liquids, gels, aerosols, creams, and pastes must be 3.4 ounces (100ml) or less per container and they must be in a 1 quart-sized, clear, plastic, zip-top bag. To make this as easy as possible for you, we have a set that includes four 3-ounce silicone bottles in a quart-sized clear pouch that’s wipeable and has a water-resistant zipper. Click here for more info about TSA rules regarding what you can pack.
Don’t forget the following travel essentials for your toiletry case:
-Toothbrush, toothpaste, floss, mouthwash
-Hairbrush or comb, hair ties, barrettes/bobby pins
-Deodorant
-Shampoo and conditioner – Dr. Bronners is a good option all-in-one option for hair care, face wash, laundry, and more
-Sunscreen and face lotion with SPF
-Makeup packed in a wipeable wristlet
-Face wash and/or makeup remover wipes and q-tips
-Nighttime Moisturizer/Lotion
-Lip balm with SPF and lipstick or lip gloss
-Personal hygiene items
-Feminine hygiene products
-Extra contacts, solution, and contact case
-Glasses and prescription sunglasses
-Prescription medication with the label/script so that you can refill if needed and not be questioned by TSA.
-Cologne/perfume
-Personal mini mirror
-Hair products like hairspray, hair gel, and beard oil
-Clothesline and detergent
-Shaving kit and extra razors
-Sewing kit/clothing care kit, stain remover
-Facial tissues and/or toilet paper
-Travel Towel
-Scissors, nail clippers, and tweezers (must be in checked luggage)
As soon as you decide to travel internationally, check the Center for Disease Control and Prevention’s website for comprehensive travel vaccines, medicines, and travel advisory information. Whether you decide to get vaccinated or not is your decision, but many vaccinations require administration 2 months before travel begins. So get informed!
-First aid kit (bandages, gauze, adhesives, etc.)
-Personal prescriptions (copies of scripts)
-Pain and fever relievers (also children’s strength if you are traveling with kids)
-Thermometer
-Cold medicines and throat lozenges
-Diarrhea/laxative medicines
-Allergy medicines
-Hydrocortisone cream/antibacterial ointment
-Multivitamins
-Sunburn relief
-Insect repellent/mosquito net/sting reliever
-Motion sickness pills or bands
-Altitude sickness pills (if you are planning to hike in higher altitudes)
-Eye drops
-Moleskin
-Medicines and vaccinations specific to the region/activity
-Hand sanitizer or wet wipes
-Prescriptions in the original packaging (you’ll want to make sure you have these in your carry-on bag just in case something were to happen to your checked luggage)
-Sleeping medicines
-Glasses and glasses case

The next thing you’ll want to do is prepare your personal item carry-on bag with anything you’ll want with you on the flight. It’s always a good idea to make sure you have an outfit (or two) and a few essential toiletries in your personal item just in case your luggage is lost. If you’ll be traveling around to multiple destinations, make sure this bag has items to keep you cozy on any train, boat, or bus rides. It’s always nice to have a bag that’s easy to access so you don’t have to get into your luggage each time you need your eye mask. But remember, you’ll be carrying all of this, so keep it light.
We recommend you consider using a small daypack or backpack as your personal carry-on item. Here are some good things to include in your carry-on bag packing list:
-Mobile device and charger
-Laptop, iPad, or E-reader and charger(s)
-Headphones (consider noise-reducing headphones if you’re sensitive to sound)
-Camera and Go Pro/video camera, memory card, and chargers
-Electrical converters and adapters
-Pillow, blanket, eye mask, and earplugs
-Journal and pen (it’s awful when you forget your pen!)
-Books and magazines
-Deck of cards and travel games
-Chapstick and lotion – it’s dry up there
-Water bottle – you’ll need to fill it up once you get through TSA
-Guidebooks, travel guides, maps, language guides, etc. (if you will need any of these upon arrival at your destination, put it in your carry-on)

Start by collecting all of your important documents in a travel document organizer. (This travel organizer holds a passport, ID, credit cards, coins, documents, a boarding pass, and a pen!) By bringing all your important information together, will help ensure you have everything you need to get from one place to the next. Not sure what you need?
-Passport/visa(s) – Visa to enter a nation legally
-Personal ID/Student ID card – If you’re a student, some companies, like Sta Travel, offer discount cards to ensure you get good deals while on the road
-Frequent flyer card(s) and other loyalty program card numbers (ex: hotel chains and AAA)
-Cash and credit card(s) – Call your credit card companies before you travel to inform them of your travel (otherwise they might turn them off to prevent perceived fraud)
-Health insurance cards/document(s)
-Travel insurance information
-Reservations and itineraries – print them and save them electronically for easy access
-Hotel and/or tour contact information
-Transportation tickets (plane, train, bus, car, etc.)
-Emergency contacts and important addresses
-Copies of all these things in case you lose your wallet
-Guidebooks and maps
As soon as you book a trip, it’s a good idea to double-check that your passports and IDs aren’t expired and that they will not expire while you are traveling internationally. If you need to get a Passport for your kids, learn more here. You’ll also want to inform your bank if you’re traveling abroad so they don’t assume fraudulent activity and freeze your credit card. Also consider emailing yourself a copy of your passport, driver’s license, medical cards, and itinerary, so if anything happens to them you’ll be able to access them online.

In most large cities, travelers should always be on the lookout for pickpockets. The easiest way to keep your belongings safe is to keep them hidden and close to you. One way to do this is to stash your valuables underneath your clothing. Another way is by locking your bags closed and using reflective accents to help folks see you at nighttime.
-Money belt or hidden pocket
-Neck wallet
-Undercover Bra Stash for credit cards and cash only
-Leg wallet
-Incognito All Terrain Money Belt which looks like a real belt!
-Luggage Travel Lock
-Reflective clothing and luggage accessories
-Bring a headlamp or mini flashlight, better to be safe than unprepared
Wearing a money belt or neck wallet lets you keep your valuables close to your body and away from prying hands. Review all the different styles here to choose what works best for you and the type of travel you’ll be doing. You may also want to choose an option with RFID protection. RFID protection keeps all passports with an RFID chip (issued after 2006) and credit cards/debit cards safe while traveling. How? It’s simple. Identity theft can occur when someone can “read” through your purse or pocket via the microchip, which has personal information stored on it. By using an RFID blocking technology, your personal information is protected. You can learn more about RFID safety from Scott Shelter, freelance journalist, and frequent traveler.

If you’re going on an extended trip, it’s essential to get your home in order before you go. Here are some simple tasks to think through before you head to the airport.
-Have the post office hold your mail
-Stop newspaper delivery
-Set up an email autoresponder (unless you plan to be connected)
-Arrange for care of pets, lawn, and plants
-Pre-pay your bills
-Prearrange school absences for children and get any home study assignments required
-The empty refrigerator of this that will expire
-Unplug appliances
-Switch off the heater/air conditioner
-Shut down the water heater
-Turn off the washing machine taps
-Lock all doors and windows
-Set up timed light system
-Store valuables in a safe place
-Leave a house key and trip itinerary with a trusted friend
-Leave flight and hotel itineraries with a relative
-Reconfirm/check-in online with the airline before you Uber, train, or shuttle to the airport
-If you will be gone for more than 30 days, it’s a good idea to check with your homeowner’s or renter’s insurance for specific instructions.
Wherever you are headed, you’re going to have a great time! Just make sure you think through your list of activities beforehand so that you’re able to bring everything you need and pick the right luggage. And pack a lightweight backpack if you can using this ultimate packing checklist. It always helps with mobility. And remember, you are a traveler. Respect the people and places you go to visit. Respect their customs, tip accordingly, try and learn their language, and truly immerse yourself in the culture. Travel changes us to be better than we were by opening our eyes and giving us newfound respect.
If you do want to learn some of the great tips for International Travel make sure to check it and learn what is important for trekking/ hiking along with having the most enjoyable life experience. If you are still confused you can print the following checklist and tick for the things you packed. Do make sure to share your moments with us and have a great time.
Post a Comment
Your email address will not be published.